第一部份: 建立一個 RESTful API
欲解決問題: MQTT Subscriber 函式所收到的資料要如何處理?
有一個 MQTT 的 Subscriber 函式需要將資料儲存或是送到遠端資料庫,函式如下:
import logging
import paho.mqtt.client as mqtt

def post_data(*args, **kw):
    """
        How to program this function?
    """
    pass

def on_connect(client, userdata, flags, rc):
    lg = logging.getLogger('info')
    lg.debug("Connected with result code: {}".format(rc))
    client.subscribe("ho600/office/power1")

def on_message(client, userdata, msg):
    lg = logging.getLogger('info')
    lg.debug("{} {}".format(msg.topic, msg.payload))
    pos_data(msg)

client = mqtt.Client()
client.on_connect = on_connect
client.on_message = on_message
client.connect("my-iot.domain.com", 1883, 60)
client.loop_forever()
如何完成這個 post_data 函式?
問題分析: post_data 該把資料寫到那裡?
Todo
要再詳細。
- 寫進本地端檔案:
寫入權限
格式
- 寫進某個資料庫(SQLite, MariaDB, PostgreSQL, SQL Server, …):
要有 host, username, password, database name, table name 及 table schema
對資料表的操作權限
- 寫進遠端 http(s) 網站:
path, querystring, request body, content_type
api key, 權限
應該使用 RESTful API 網站,資料表的 CRUD 操作就是對應 HTTP POST, GET, PATCH/PUT, DELETE 方式。
初始化開發環境
使用工具/函式庫/資料庫管理系統/…:
程式編輯器: Visual Studio Code
版本控制器: git
套件管理工具: scoop(Windows PowerShell)/brew(macos)/apt(ubuntu)
資料庫管理系統: MariaDB
Python3
Django-2.2.x
virtualenv
django-guardian
django-restframework
VSC 對我而言,就是一個方便、高級的 Vim 編輯器,可以集檔案管理樹、 vim 編輯器、Shell console 在同一個畫面。
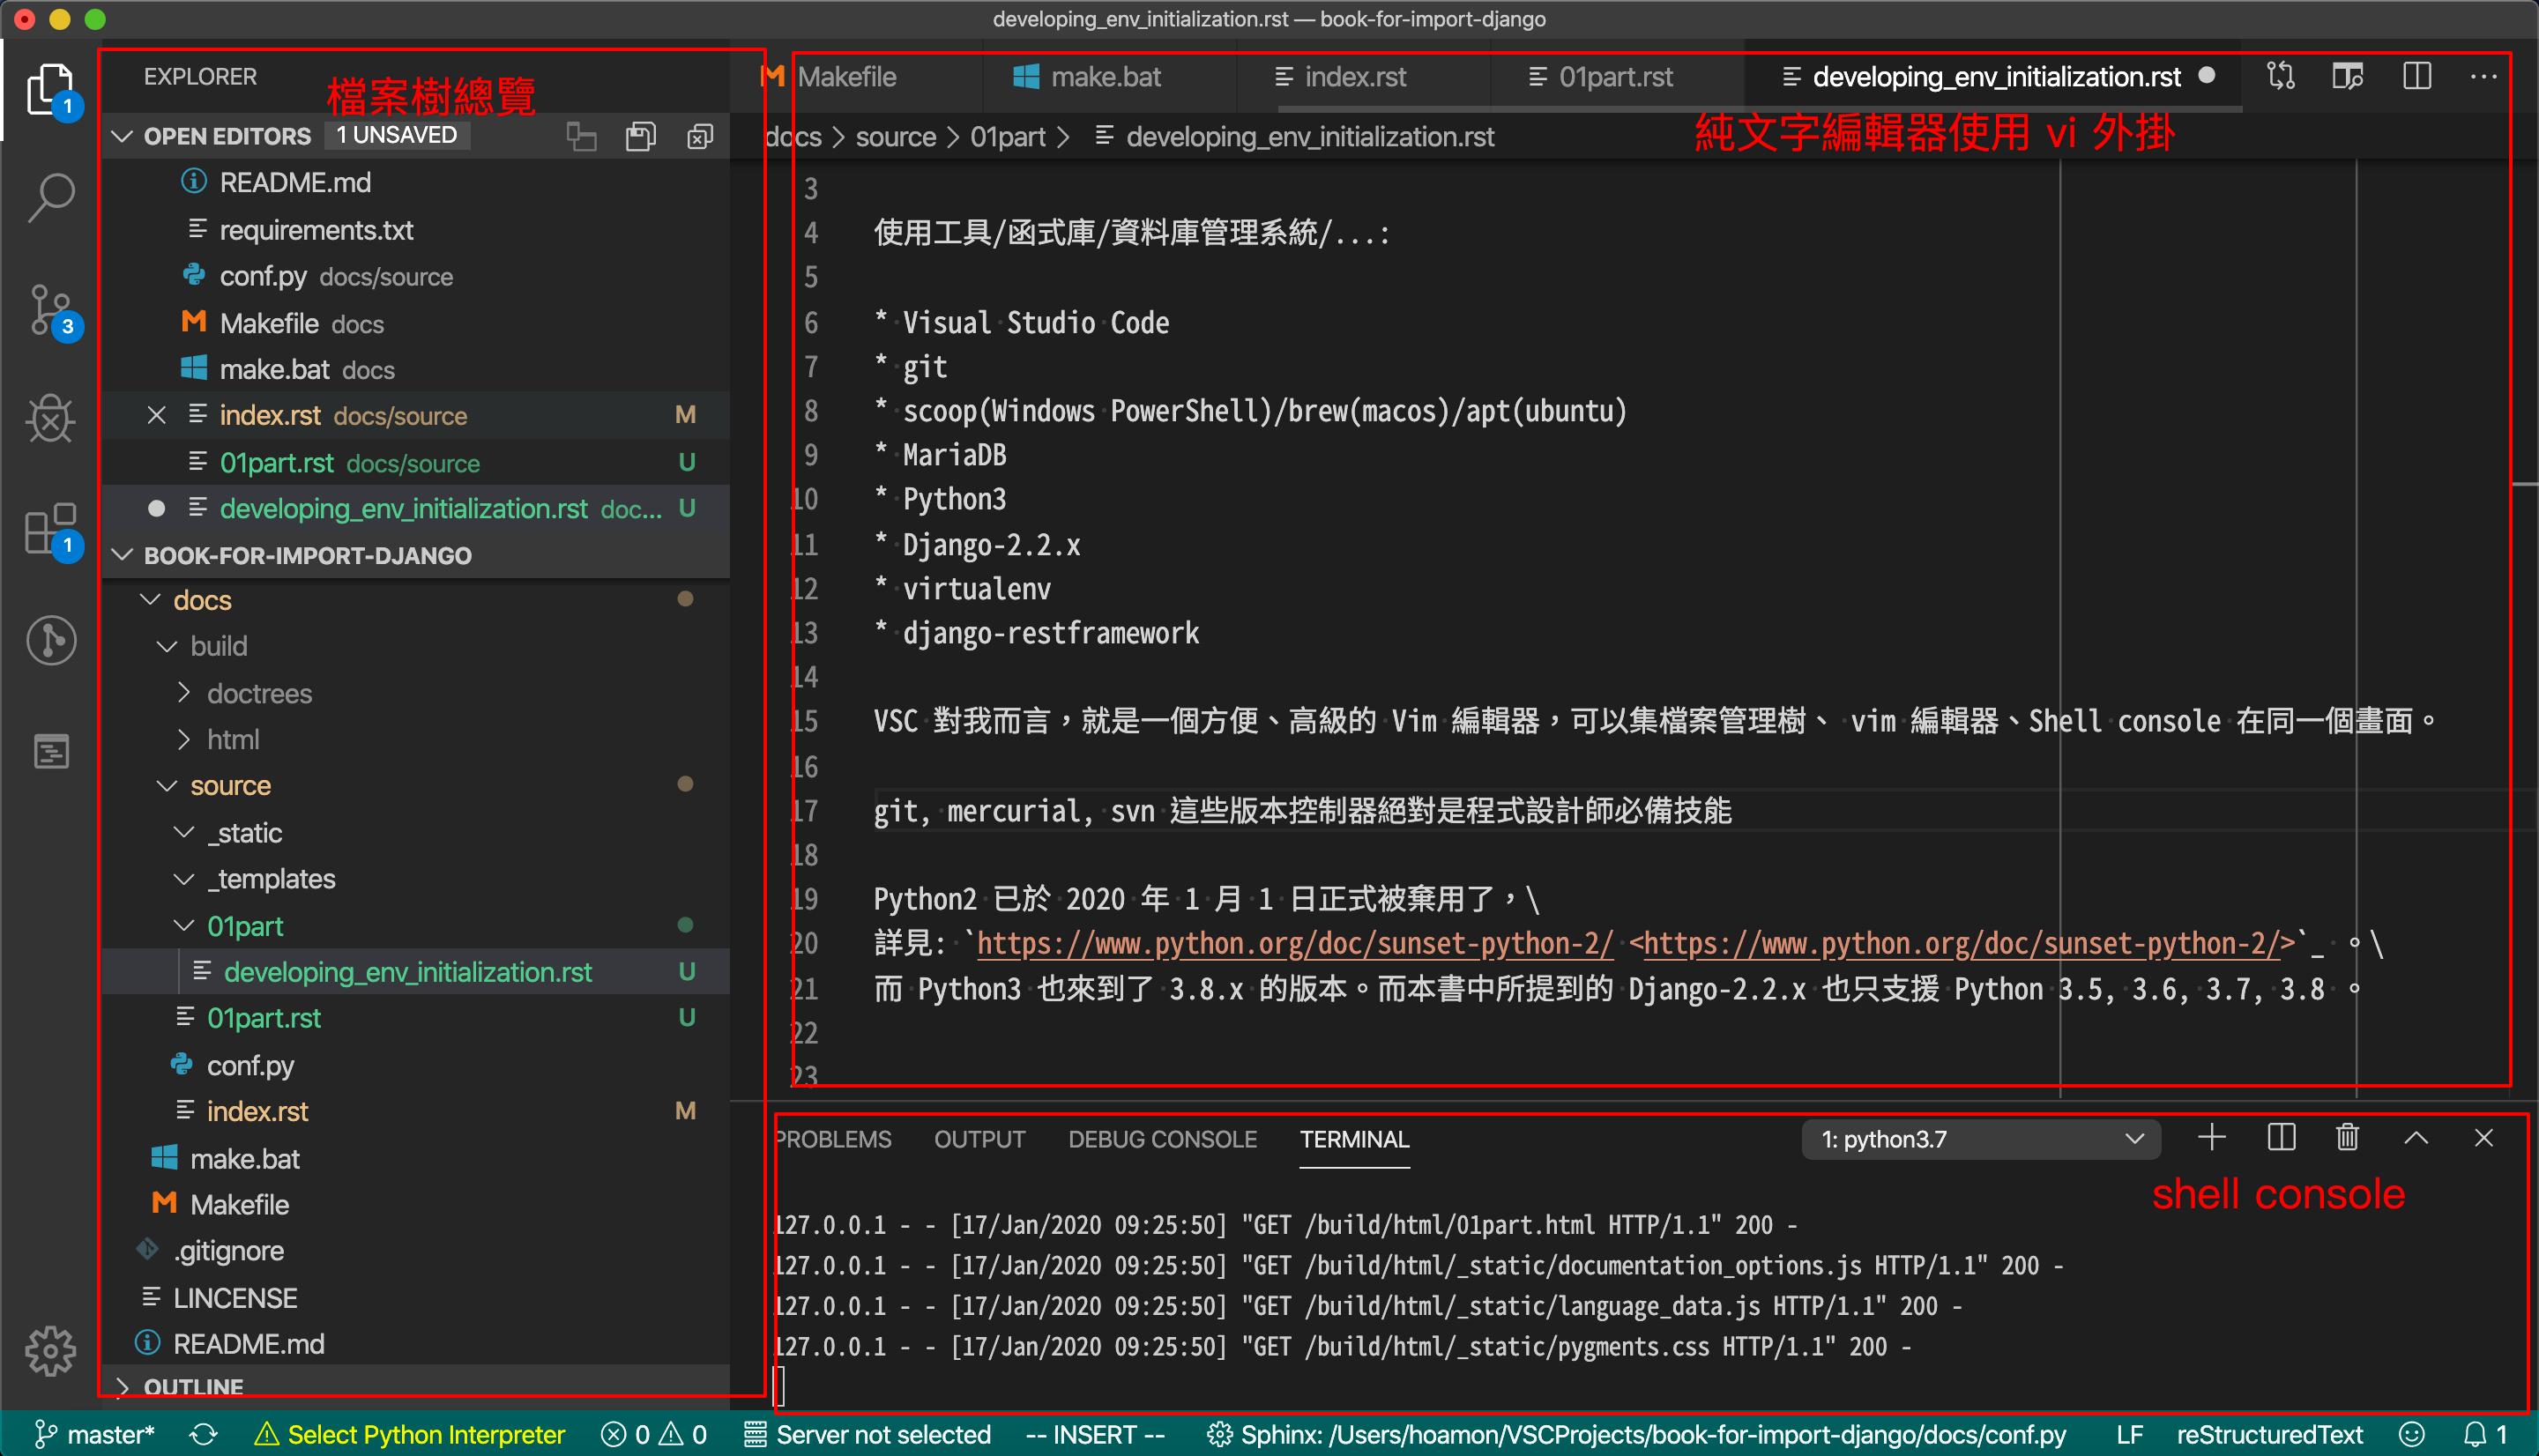
Visual Studio Code 畫面
版本控制器絕對是程式設計師必備技能,目前常見的有 git, mercurial, svn ,而 git 是目前最熱門的。
套件管理工具:
Python2 已於 2020 年 1 月 1 日正式被棄用了,詳見: https://www.python.org/doc/sunset-python-2/ 。而 Python3 也來到了 3.8.x 的版本。而本書中所提到的 Django-2.2.x 也只支援 Python 3.5, 3.6, 3.7, 3.8 。
Todo
再詳細講講每一個應用軟體
初始化 django-based 專案
$ virtualenv -p python3 --no-site-packages restful_api_site.py3env
$ source restful_api_site.py3env/bin/activate \
# In PowerShell: \
# PS C:\> restful_api_site.py3env\scripts\activate
(restful_api_site.py3env) $ pip install "Django>2.2,<2.3"
...
Successfully installed Django-2.2.9 sqlparse-0.3.0
(restful_api_site.py3env) $ django-admin startproject restful_api_site
restful_api_site 專案從無到初始化的程式碼差異比對: cc69bfb
(restful_api_site.py3env) $ cd restful_api_site
(restful_api_site.py3env) restful_api_site/ $ ls
manage.py        restful_api_site
(restful_api_site.py3env) restful_api_site/ $ git init && git add . && git ci -m '...'
...
[master cc69bfb] ...
5 files changed, 126 insertions(+)
create mode 100644 ...
(restful_api_site.py3env) restful_api_site/ $ git di cc69bfb^..cc69bfb --name-only
restful_api_site/manage.py
restful_api_site/restful_api_site/__init__.py
restful_api_site/restful_api_site/settings.py
restful_api_site/restful_api_site/urls.py
restful_api_site/restful_api_site/wsgi.py
程式檔說明:
manage.py: 在本地端開發時,用以執行一個 http deamon 的執行檔
__init__.py: 為一空內容的純文字檔,置於第二層的 restful_api_site/ 中,
這樣第二層的 resuful_api_site 可視為一個 module * settings.py: 專案的基本設定檔 * urls.py: 當 restful_api_site 運作在 http deamon 或 WSGI deamon 上, urls.py 可載明進入的 url path 為何? 並對應到那些 view function * wsgi.py: 給 WSGI server 的進入點,讓 restful_api_site 運作在 WSGI server 上
(restful_api_site.py3env) restful_api_site/ $ git di cc69bfb^..cc69bfb restful_api_site/settings.py
diff --git a/restful_api_site/restful_api_site/settings.py b/restful_api_site/restful_api_site/settings.py
new file mode 100644
index 0000000..5a8707d
--- /dev/null
+++ b/restful_api_site/restful_api_site/settings.py
@@ -0,0 +1,120 @@
+"""
+Django settings for restful_api_site project.
+Generated by 'django-admin startproject' using Django 2.2.9.
...
+"""
...
+ROOT_URLCONF = 'restful_api_site.urls'
...
+WSGI_APPLICATION = 'restful_api_site.wsgi.application'
+DATABASES = {
+    'default': {
+        'ENGINE': 'django.db.backends.sqlite3',
+        'NAME': os.path.join(BASE_DIR, 'db.sqlite3'),
+    }
+}
...
+LANGUAGE_CODE = 'en-us'
+TIME_ZONE = 'UTC'
+USE_I18N = True
+USE_L10N = True
+USE_TZ = True
+STATIC_URL = '/static/'
此修改版本的 settings.py 內容可到 Github 的 restful_api_site/restful_api_site/settings.py(cc69bfb9 commit) 瀏覽。
在目前這個階段, restful_api_site 是一個擁有 django 預設功能的網站,而資料庫管理系統上預設是用 sqlite3 ,其設定方式在 settings.py :
# settings.py
DATABASES = {
    'default': {
        'ENGINE': 'django.db.backends.sqlite3',
        'NAME': os.path.join(BASE_DIR, 'db.sqlite3'),
    }
}
運作網站的第一步是要建立資料庫結構:
(restful_api_site.py3env) restful_api_site/ $ ./manage.py migrate
Operations to perform:
  Apply all migrations: admin, auth, contenttypes, sessions
Running migrations:
  Applying contenttypes.0001_initial... OK
  Applying auth.0001_initial... OK
  Applying admin.0001_initial... OK
  ...
  Applying contenttypes.0002_remove_content_type_name... OK
  ...
  Applying sessions.0001_initial... OK
運作本地端 http deamon:
(restful_api_site.py3env) restful_api_site/ $ ./manage.py runserver
...
January 17, 2020 - 03:35:27
Django version 2.2.9, using settings 'restful_api_site.settings'
Starting development server at http://127.0.0.1:8000/
Quit the server with CONTROL-C.
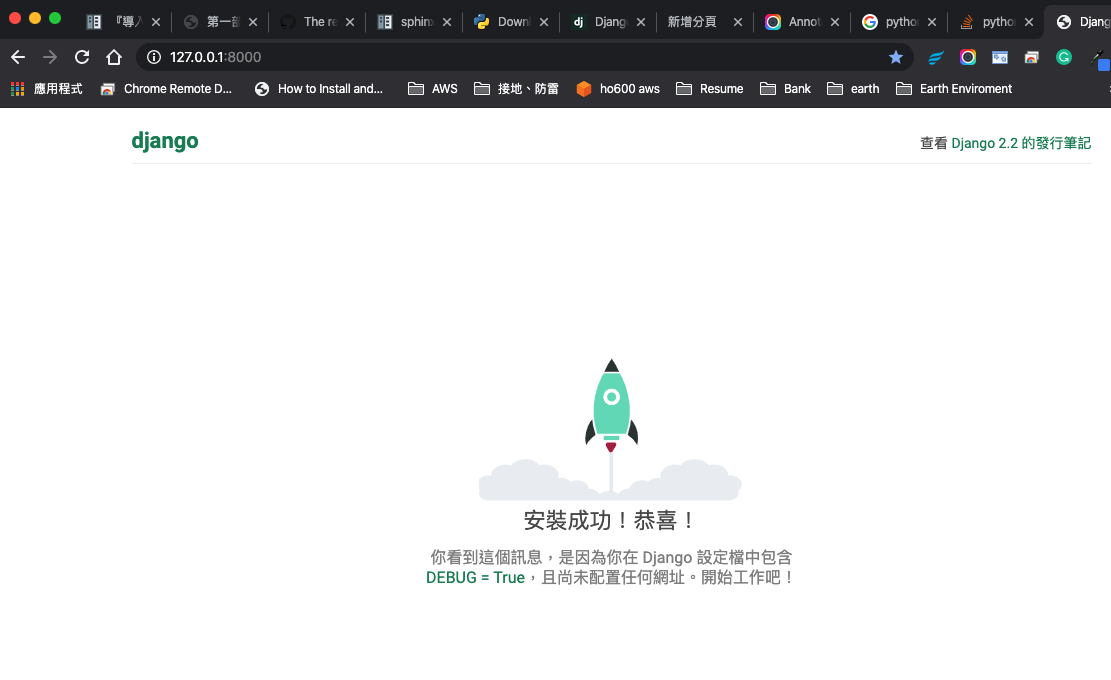
瀏覽器觀看成果如下:

因為 settings.LANGUAGE_CODE = 「en-us」 ,所以網頁是英文的
接下來,我們修改 settings.LANGUAGE_CODE 及 settings.DATABASES[『default』] ,讓語言預設是使用正體中文、資料庫則是改用 MariaDB :
(restful_api_site.py3env) restful_api_site/ $ git di
diff --git a/restful_api_site/restful_api_site/settings.py b/restful_api_site/restful_api_site/settings.py
index 5a8707d..d7f9a35 100644
--- a/restful_api_site/restful_api_site/settings.py
+++ b/restful_api_site/restful_api_site/settings.py
@@ -75,8 +75,16 @@ WSGI_APPLICATION = 'restful_api_site.wsgi.application'

DATABASES = {
    'default': {
-        'ENGINE': 'django.db.backends.sqlite3',
-        'NAME': os.path.join(BASE_DIR, 'db.sqlite3'),
+        'ENGINE': 'django.db.backends.mysql',
+        'NAME': 'restful_api_site',
+        'USER': 'restful_api_site',
+        'PASSWORD': 'restful_api_site_pw',
+        'HOST': 'my.mariadb.host',
+        'PORT': '3306',
+        'OPTIONS': {
+        },
    }
}
...
-LANGUAGE_CODE = 'en-us'
+LANGUAGE_CODE = 'zh-Hant'
本次修改詳見 ca533439 。
設定 MariaDB 的資料庫名、使用者帳號、密碼、權限如下:
$ mysql -h my.mariadb.host -u root -p
MariaDB [(none)]> CREATE DATABASE restful_api_site CHARACTER SET utf8mb4 DEFAULT COLLATE utf8mb4_unicode_ci;
MariaDB [(none)]> create user 'restful_api_site'@'%' identified by 'restful_api_site_pw';
MariaDB [(none)]> GRANT ALL PRIVILEGES on restful_api_site.* to restful_api_site@'%';
MariaDB [(none)]> \q
並為這個 restful_api_site 專案安裝 MariaDB driver(mysqlclient) ,首先我們把套件紀錄到 restful_api_site/requirements.txt :
# requirements.txt
Django>=2.2,<2.3
mysqlclient==1.4.5
再使用 pip 安裝它:
(restful_api_site.py3env) restful_api_site/ $ pip install -r requirements.txt
...
Successfully installed mysqlclient-1.4.5
(restful_api_site.py3env) restful_api_site/ $ \
ls ../restful_api_site.py3env/lib/python3.7/site-packages/mysqlclient-1.4.5.dist-info
INSTALLER     LICENSE       METADATA      RECORD        WHEEL         top_level.txt
再作一次資料表生成:
(restful_api_site.py3env) restful_api_site/ $ ./manage.py migrate
Operations to perform:
  Apply all migrations: admin, auth, contenttypes, sessions
Running migrations:
  Applying contenttypes.0001_initial... OK
  Applying auth.0001_initial... OK
  Applying admin.0001_initial... OK
  ...
  Applying contenttypes.0002_remove_content_type_name... OK
  ...
  Applying sessions.0001_initial... OK
再次運作本地端 http deamon ,即可在瀏覽器中見到如下:
到本階段為止,範例程式碼的進度在 76c5dd81 。
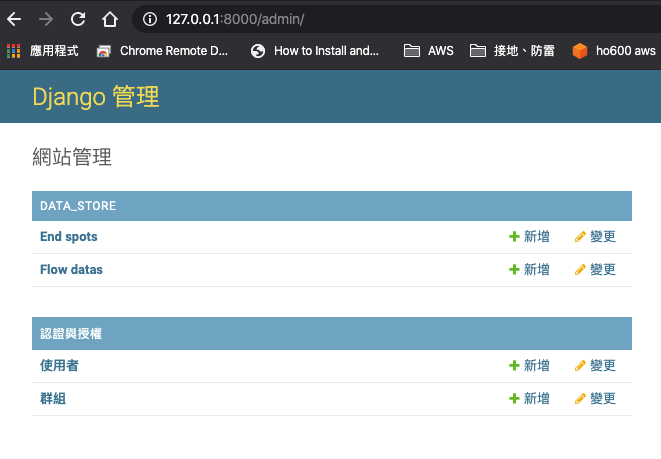
Django Admin 操作
預設的 urls.py 有列入 Django Admin 模組的進入網址:
from django.contrib import admin
from django.urls import path
urlpatterns = [
    path('admin/', admin.site.urls),
]
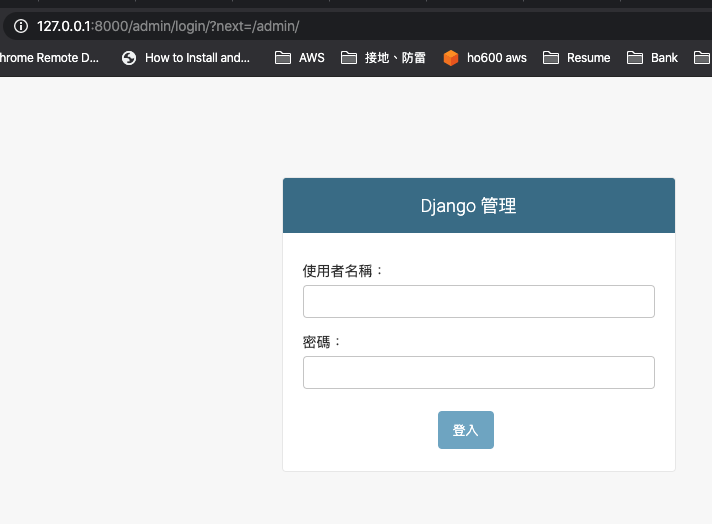
所以直接到 http://127.0.0.1:8000/admin/ ,可以看見一個登入頁:
我們可以利用 django 內建的 management command 來創建一個超級管理員帳戶:
(restful_api_site.py3env) restful_api_site/ $ ./manage.py createsuperuser
用者名稱 (leave blank to use 'hoamon'):
電子信箱: hoamon@ho600.com
Password:
Password (again):
Superuser created successfully.
(restful_api_site.py3env) restful_api_site/ $
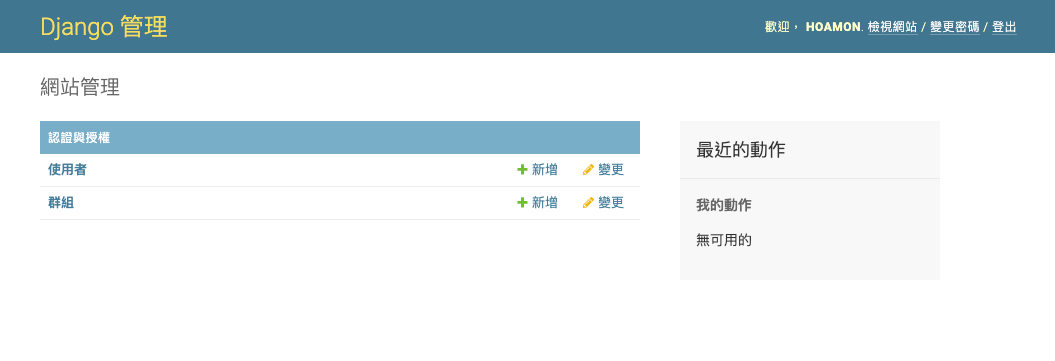
使用 hoamon 登入 /admin/ 後,可以看到目前只有 2 個 Models (資料表)可以操作:
進入「使用者」 Model 頁面:
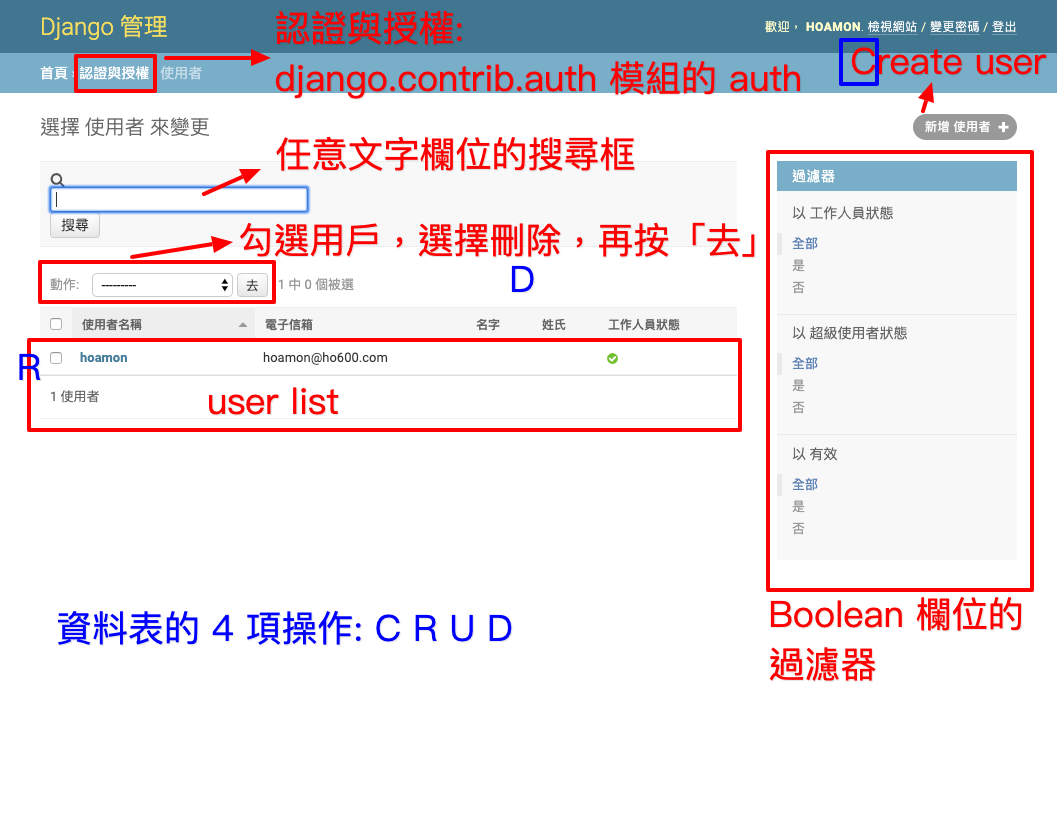
「U」的部份要點入單一紀錄的頁面來操作
資料表的 4 項基本操作:
Create(創建)
Read(讀取)
Update(更新)
Delete(刪除)
在網站開發者的角度上,來說,我們就是在設計「不同介面」來進行這 4 項操作,層級從低至高如下:
DB shell
Django shell
Web page
API
API over API
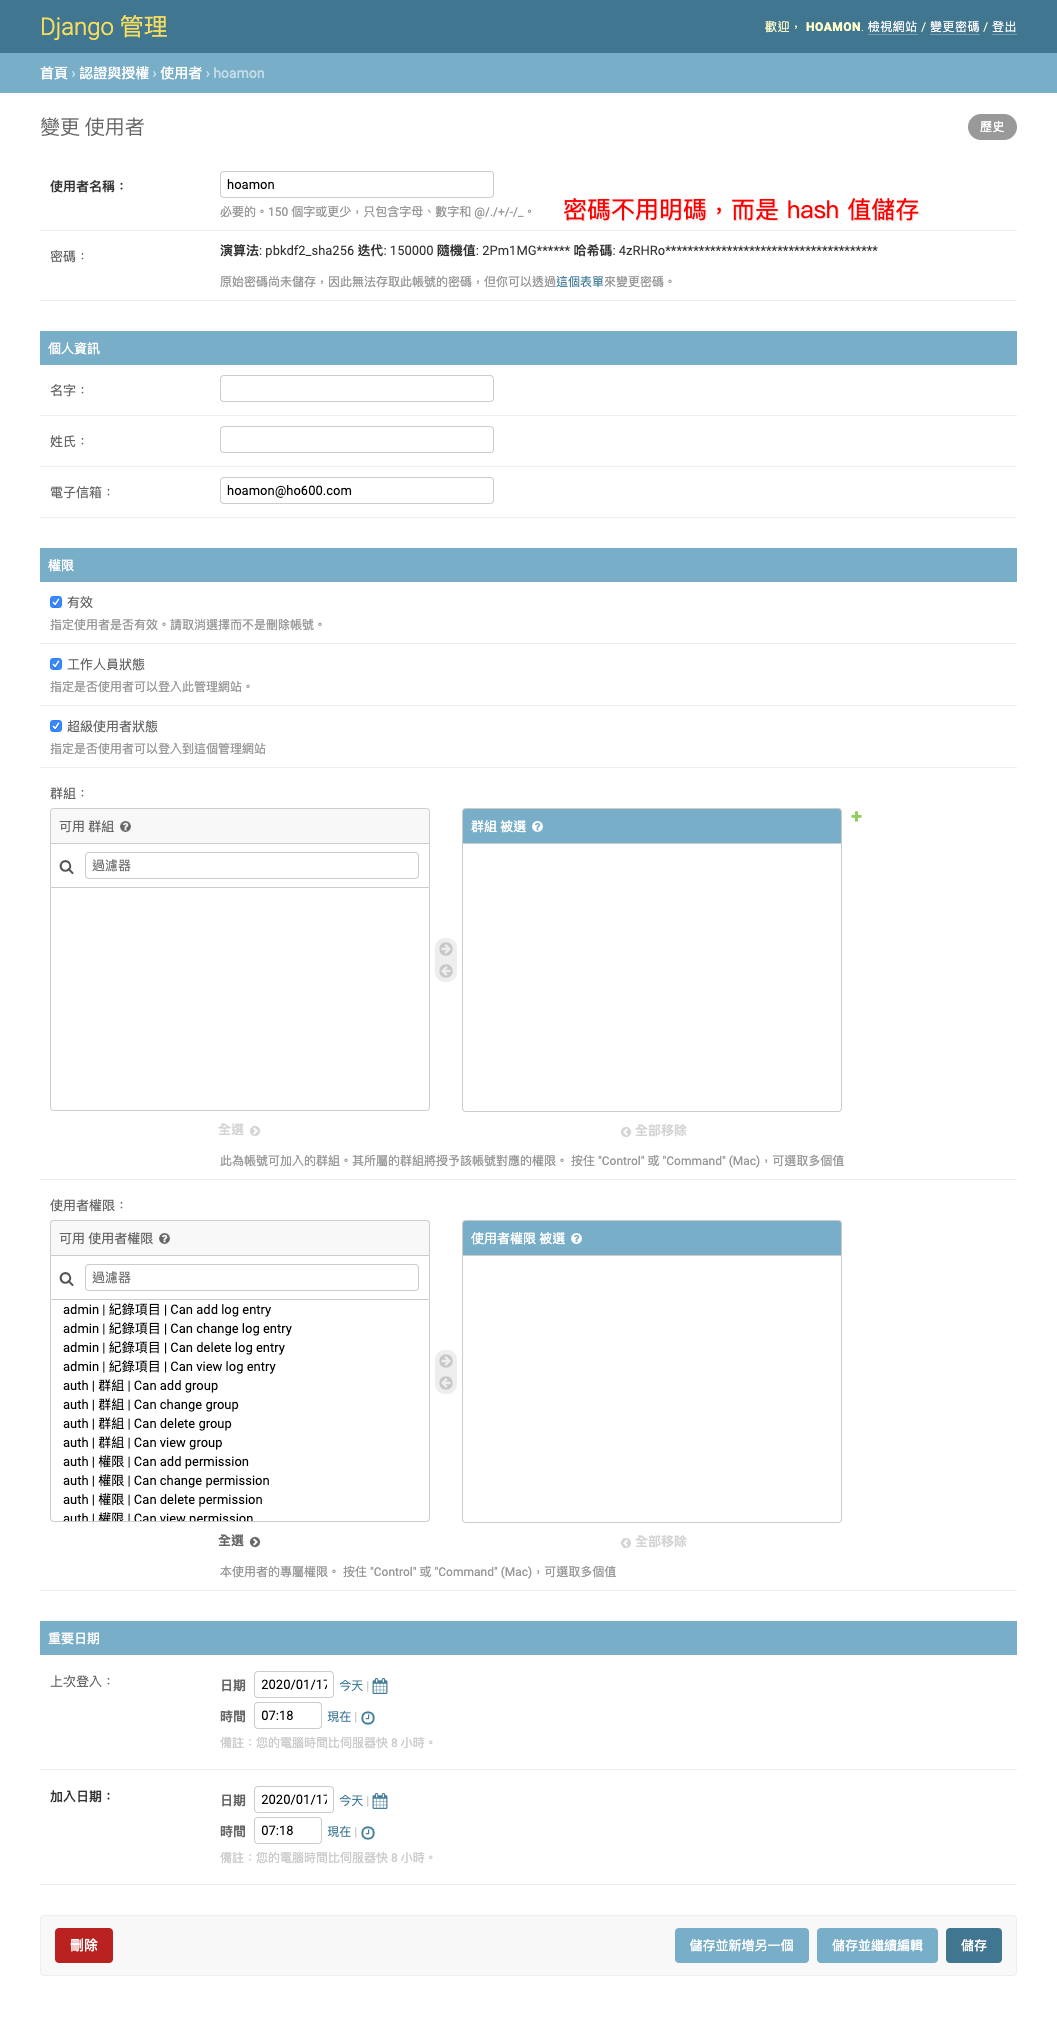
列出 User Model 的所有欄位,並包含相關聯的欄位,如: groups, user_permissions
在 Django Admin 模組的頁面中,我們可以使用 superuser 的帳戶操作:
創建/讀取/更新/刪除使用者、群組
將使用者加入某一群組
- 賦與使用者或群組權限
在這個階段, Django 提供的權限模式,只限於規範某個「使用者或群組」對某個「Model」的權限
導入 django-guardian 後,才能達到規範某個「使用者或群組」對某個 Model 內某筆紀錄的權限
Django ORM(Object-relational mapping)
在資料操作上, Django 將 SQL 語法包裝起來,提供 Python class 來操作資料,幾個範例如下:
(restful_api_site.py3env) restful_api_site/ $ ./manage.py shell
Python 3.7.5 (default, Dec  8 2019, 11:41:26)
Type 'copyright', 'credits' or 'license' for more information
IPython 7.11.1 -- An enhanced Interactive Python. Type '?' for help.

In [1]: from django.contrib.auth.models import User, Group
In [2]: u = User(username='hoamon', email='hoamon@ho600.com')
In [3]: u.save()
# SQL3: INSERT INTO auth_user (`username`, `email`) VALUES ('hoamon', 'hoamon@ho600.com');
In [4]: User.objects.get(username='hoamon')
# SQL4: SELECT * from auth_user where username = 'hoamon';
In [5]: User.objects.get(username='hoamon').update(last_name='ho')
# SQL5: UPDATE auth_user set last_name = 'ho' where username = 'hoamon';
In [6]: User.objects.get(username='hoamon').delete()
# SQL6: DELETE FROM auth_user where username = 'hoamon';
備註
上面的 Django shell ,與預設的 Django shell 長得不一樣,是因為有另外安裝 ipython 套件,安裝方式: pip install ipython
ORM 的概念就是把 Table 對應成 Model class ,而 Table 中的 1 筆紀錄就是 Model class 實例化後的 object 。
Django 預設給的 User, Group 的可簡單定義如下:
class Group(models.Model):
    name = models.CharField(max_length=150, unique=True)
    permissions = models.ManyToManyField(Permission, blank=True)
class User(models.Model):
    username = models.CharField(max_length=150)
    password = models.CharField(max_length=128)
    first_name = models.CharField(max_length=30, blank=True)
    last_name = models.CharField(max_length=150, blank=True)
    email = models.EmailField(blank=True)
    is_active = models.BooleanField(default=False)
    is_staff = models.BooleanField(default=False)
    is_superuser = models.BooleanField(default=False)
    date_joined = models.DateTimeField(auto_now_add=True)
    last_login = models.DateTimeField()
    groups = models.ManyToManyField(Group, blank=True)
    user_permissions = models.ManyToManyField(Permission, blank=True)
Permission, Group, User 等 3 個 Model 所對應到的 DB Table 如下:
auth_permission Table
id |
name |
content_type_id |
codename |
|---|---|---|---|
1 |
Can add log entry |
1 |
add_logentry |
2 |
Can change log entry |
1 |
change_logentry |
3 |
Can delete log entry |
1 |
delete_logentry |
… |
… |
… |
… |
auth_group Table
id |
name |
|---|---|
1 |
超級管理員 |
2 |
測試群 |
3 |
只是群組 |
… |
… |
auth_user Table
id |
username |
… |
|---|---|---|
1 |
hoamon |
… |
2 |
ho600 |
… |
3 |
test_user |
… |
… |
… |
… |
auth_user_groups Table
id |
user_id |
group_id |
|---|---|---|
1 |
1 |
1 |
2 |
2 |
1 |
3 |
3 |
2 |
… |
… |
… |
auth_user_user_permissions Table
id |
user_id |
permission_id |
|---|---|---|
1 |
1 |
2 |
2 |
2 |
2 |
3 |
3 |
2 |
… |
… |
… |
auth_group_permissions Table
id |
group_id |
permission_id |
|---|---|---|
1 |
1 |
3 |
2 |
2 |
3 |
3 |
3 |
3 |
… |
… |
… |
以上這幾張表,我們也可以利用 ./manage.py dbshell 進入 MariaDB shell 來觀看它們的結構:
(restful_api_site.py3env) restful_api_site/ $ ./manage.py dbshell
MariaDB [restful_api_site]> show create table auth_group;
+------------+--------------------------------------------------------------------+
| Table      | Create Table                                                       |
| auth_group | CREATE TABLE `auth_group` (                                        |
|            |    `id` int(11) NOT NULL AUTO_INCREMENT,                           |
|            |    `name` varchar(150) COLLATE utf8mb4_unicode_ci NOT NULL,        |
|            |    PRIMARY KEY (`id`),                                             |
|            |    UNIQUE KEY `name` (`name`)                                      |
|            | ) ENGINE=InnoDB AUTO_INCREMENT=2                                   |
|            |   DEFAULT CHARSET=utf8mb4 COLLATE=utf8mb4_unicode_ci               |
+------------+--------------------------------------------------------------------+
1 row in set (0.010 sec)
ORM 簡單操作範例
創建 2 個使用者及 1 個群組
將 2 個使用者都加入這個群組
刪除其中 1 個使用者
列出群組中的使用者
In [1]: from django.contrib.auth.models import User, Group
In [2]: u1 = User(username='user1', email='user1@ho600.com')
In [3]: u1.save()
In [4]: u2 = User(username='user2', email='user2@ho600.com')
In [5]: u2.save()
In [6]: g1 = Group(name='Normal User')
In [7]: g1.save()
In [8]: u1.groups.add(g1)
In [9]: g1.user_set.add(u2)
In [10]: for u in User.objects.all().order_by('id')[:2]:
    ...:     print("{}, {}".format(u.id, u.username))
1, user1
2, user2
In [11]: from django.db.models import Q
In [12]: for u in g1.user_set.all().filter(
    ...:     username__in=['user1', 'user2']
    ...:     ).filter(Q(id=1, username='user1')
    ...:              |Q(id=2, username='user2')
    ...:             ).order_by('-id'):
    ...:     print(u.username)
2 user2
1 user1
In [13]: u2.delete()
In [14]: for u in g1.user_set.filter(username__isnull=False):
    ...:     print(u.username)
user1
Model 設計
從 MQTT Subscriber 函式所傳來的資料格式,可能如下:
欄位 |
值 |
說明 |
|---|---|---|
topic |
ho600/office/power1 |
Iot 感測器登記的代號 |
timestamp |
1579262426.123045 |
感測器紀錄的時間,以 unix timestamp 格式紀錄 |
value |
23.45 |
感測值,如: 電流值、溫濕度、亮度 |
這樣類型的資料,我們可簡單分成兩個 Models 儲存, EndSpot 放置感測器的設定,FlowData 則紀錄每一筆感測資料。
class EndSpot(models.Model):
    topic = models.CharField(max_length=150, unique=True)
    note = models.TextField()

    class Meta:
        permissions = (
            ('add_flowdata_under_this_end_spot', 'Add FlowData records under This EndSpot'),
        )

class FlowData(models.Model):
    end_spot = models.ForeignKey(EndSpot, on_delete=models.CASCADE)
    timestamp = models.DecimalField(max_digits=20, decimal_places=6, db_index=True)
    value = models.FloatField() #IFNO: in some cases, DecimalField is better
    create_time = models.DateTimeField(auto_now_add=True, db_index=True)
接下來我們將這 2 個 Models 放置在 data_store module ,在 Django 中,又可稱為 app 。利用 django command 來新增這一個 app :
(restful_api_site.py3env) restful_api_site/ $ django-admin startapp data_store
(restful_api_site.py3env) restful_api_site/ $ git add data_store && \
git ci -m "Initial data_store app"
[master c479679] Initial data_store app
7 files changed, 17 insertions(+)
create mode 100644 restful_api_site/data_store/__init__.py
create mode 100644 restful_api_site/data_store/admin.py
create mode 100644 restful_api_site/data_store/apps.py
create mode 100644 restful_api_site/data_store/migrations/__init__.py
create mode 100644 restful_api_site/data_store/models.py
create mode 100644 restful_api_site/data_store/tests.py
create mode 100644 restful_api_site/data_store/views.py
此階段的修改可見 c479679b 。
接下來,我們要執行如下工作:
添加 data_store 到 settings.INSTALLED_APPS ( 修改:9006318 )
把 2 個 Models 定義置入 data_store/models.py ( commit:c6e82a5b )
執行 ./manage.py makemigrations 以生成 db schema migration 檔 ( commit:945ab91b )
執行 ./manage.py migrate , Django 會拿上一動作的 migration 檔來調整資料庫中的表架構: 新增表格、新增欄位、新增 Key 、…
執行 migrate 指令時, django 會從 django_migrations table 中,找尋已執行的 migrations file 紀錄:
id |
app |
name |
applied |
1 |
contenttypes |
0001_initial |
2020-01-17 04:31:16.111321 |
4 |
admin |
0002_logentry_remove_auto_add |
2020-01-17 04:31:16.545302 |
. |
… |
… |
|
17 |
sessions |
0001_initial |
2020-01-17 04:31:16.812397 |
在比對出 data_store/migrations/0001_initial.py 的紀錄並未在 django_migrations 中,那就執行 data_store/migrations/0001_initial.py 內的程式:
# data_store/migrations/0001_initial.py
class Migration(migrations.Migration):
    initial = True
    dependencies = [
    ]
    operations = [
        migrations.CreateModel(
            name='EndSpot',
            fields=[
                ('id', models.AutoField(auto_created=True,
                                        primary_key=True,
                                        serialize=False,
                                        verbose_name='ID')),
                ('topic', models.CharField(max_length=150, unique=True)),
                ('note', models.TextField()),
            ],
            options={
                'permissions': (('add_flowdata_under_this_end_spot',
                                'Add FlowData records under This EndSpot'),),
            },
        ),
        migrations.CreateModel(
            name='FlowData',
            fields=[
                ('id', models.AutoField(auto_created=True,
                                        primary_key=True,
                                        serialize=False,
                                        verbose_name='ID')),
                ('timestamp', models.DecimalField(db_index=True,
                                                decimal_places=6,
                                                max_digits=20)),
                ('value', models.FloatField()),
                ('create_time', models.DateTimeField(auto_now_add=True,
                                                    db_index=True)),
                ('end_spot',
                 models.ForeignKey(on_delete=django.db.models.deletion.CASCADE,
                                   to='data_store.EndSpot')),
            ],
        ),
    ]
執行 migrate 指令的輸出:
(restful_api_site.py3env) restful_api_site/ $ ./manage.py migrate
Operations to perform:
  Apply all migrations: admin, auth, contenttypes, data_store, sessions
Running migrations:
  Applying data_store.0001_initial... OK
資料庫結構在升級後,會多了 data_store_endspot, data_store_flowdata 兩張表。在這個階段要新增紀錄,只有利用 dbshell, shell 指令,以 SQL 或 Python ORM 語法處理。
一個便利的方式,是將 EndSpot, FlowData 登記到 Admin 模組中,修改程式碼( a9fa501 )如下:
# data_store/admin.py
from django.contrib import admin
from data_store.models import EndSpot, FlowData

class EndSpotAdmin(admin.ModelAdmin):
    pass
admin.site.register(EndSpot, EndSpotAdmin)

class FlowDataAdmin(admin.ModelAdmin):
    pass
admin.site.register(FlowData, FlowDataAdmin)
在 Django Admin 頁面就能見到 EndSpot, FlowData Models :
如同 User, Group models ,也可以對 EndSpot, FlowData 作 CRUD 操作
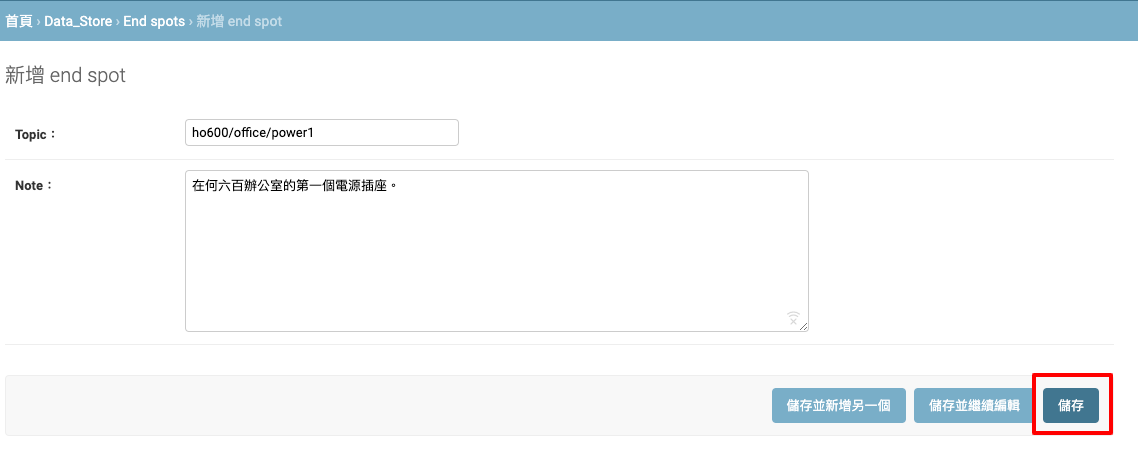
Topic 為必填欄位, Note 則隨意
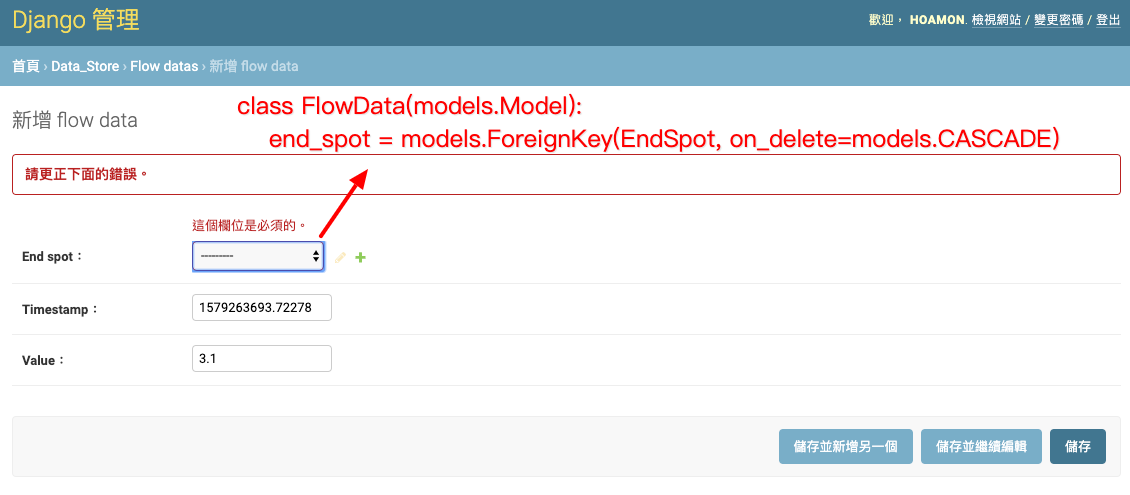
建立 FlowData 紀錄時, End Spot object 為必填欄位
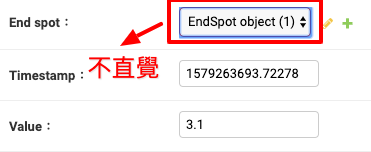
在 End Spot 下拉選單中,只秀出 id ,難以辦識
class EndSpot(models.Model):
    def __str__(self):
        return self.topic
在 EndSpot Model 中,加入 __str__ 函式,可自定偏好的顯示名稱( 2cc4f64 )。
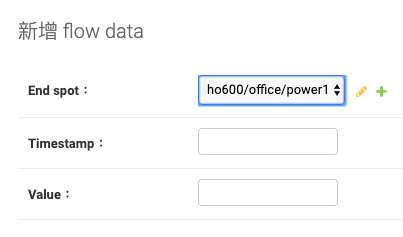
可顯示 ho600/office/power1
使用 django-restframework 來建立 API 服務
HTTP METHOD:
POST => Create
GET => Read
PATCH/PUT => Update
DELETE => Delete
$ telnet icanhazip.com 80
Trying 104.20.17.242...
Connected to icanhazip.com.
Escape character is '^]'.
GET / HTTP/1.0               <-- I type
Host: icanhazip.com          <-- I type

HTTP/1.1 200 OK
Date: Fri, 17 Jan 2020 17:01:32 GMT
Content-Type: text/plain
Content-Length: 14
Connection: close
Set-Cookie: __cfduid=d1fb84a3f46ea313400cb2c5731f2e88a1579280492; expires=Sun, 16-Feb-20 17:01:32 GMT; path=/; domain=.icanhazip.com; HttpOnly; SameSite=Lax
Access-Control-Allow-Origin: *
Access-Control-Allow-Methods: GET
X-RTFM: Learn about this site at http://bit.ly/icanhazip-faq and do not abuse the service.
X-SECURITY: This site DOES NOT distribute malware. Get the facts. https://goo.gl/1FhVpg
X-Worker-Version: 20190626_1
Alt-Svc: h3-24=":443"; ma=86400, h3-23=":443"; ma=86400
Server: cloudflare
CF-RAY: 5569e427fcaff065-TPE

92.196.51.109
Connection closed by foreign host.
首先是 pip install djangorestframework ,記得把它登記到 requirements.txt ( 19e1982 ),這樣之後在換地方開發時,才不會忘記安裝它。
要為 FlowData 生出 GET/POST 的 API endpoint ,只要處理下面 4 個地方:
將 rest_framework 加入 settings.INSTALLED_APPS ( 4c92c72 )
撰寫 FlowDataSerializer ( 061dc7f )
撰寫 FlowDataModelViewSet ( 520ae9e5 )
在 restful_api_site/urls.py 設定 router ( 824cc7a2 )
完成後,即可在 http://127.0.0.1:8000/api/v1/ 看到 BrowsableAPIRenderer 生成出來的 html 網頁:
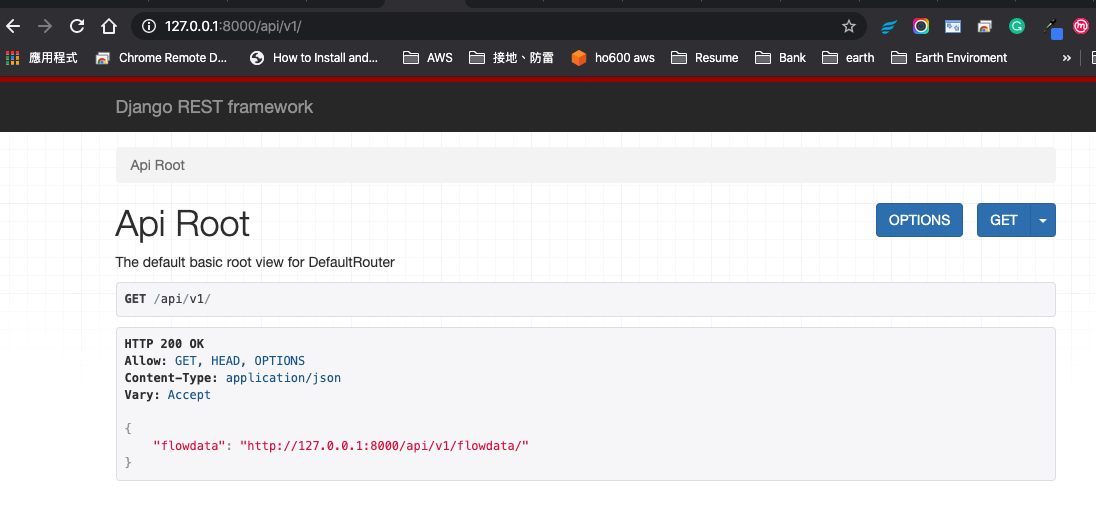
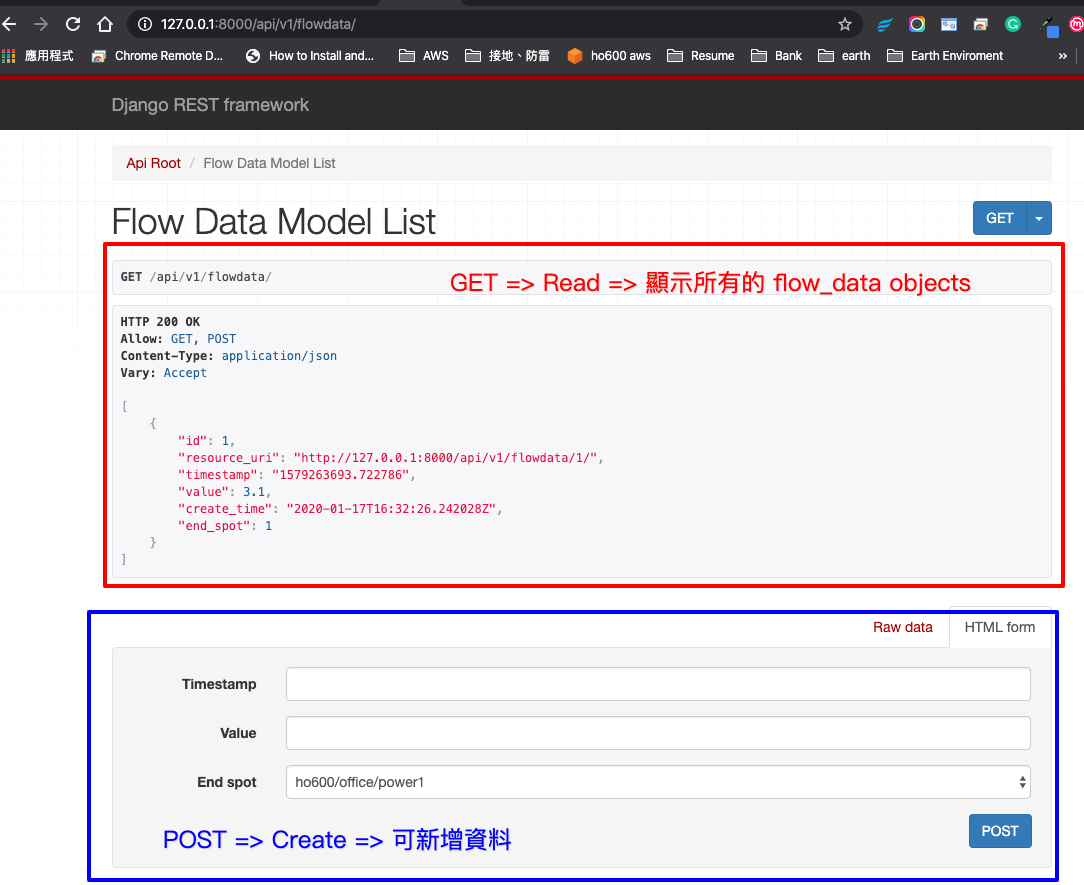
/api/v1/flowdata/ 的畫面,同時可以看到 objects ,也提供 POST Form
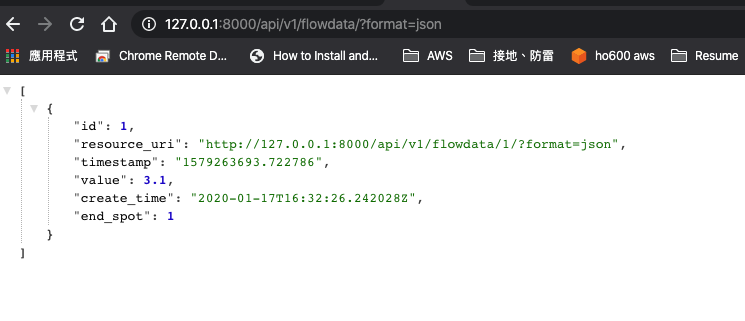
querystring 設定 format=json 後,則只出現 json 格式的所有紀錄
先使用 curl 來測試:
$ curl -X POST -H "Content-Type: application/json" \
-d '{ "end_spot": 1, "timestamp": "1579283621.327474", "value": 1.4 }' \
'http://127.0.0.1:8000/api/v1/flowdata/?format=json'
{"id":4,"resource_uri":"http://127.0.0.1:8000/api/v1/flowdata/4/?format=json","timestamp":"1579283621.327474","value":1.4,"create_time":"2020-01-17T18:00:40.909966Z","end_spot":1}
可以得到伺服器回傳給我們的新紀錄 id 為 4 。這樣,我們就可以把 post_data 函式寫出來了:
1 2 3 4 5 6 7 8 9 10 11 12 13 14 15 16 17 18 19 | import requests
def post_data(*args, **kw):
msg = args[0]
url = 'http://127.0.0.1:8000/api/v1/flowdata/?format=json'
topic_mapping = {
"ho600/office/power1": 1,
}
data = {
"end_spot": topic_mapping[msg.topic],
"timestamp": msg.payload.get('timestamp', ''),
"value": msg.payload.get('value', ''),
}
res = requests.post(url, data=data)
print(res.text)
#INFO: {"id":5,
# "resource_uri":
# "http://127.0.0.1:8000/api/v1/flowdata/5/?format=json",
# "timestamp":"123.123456","value":4.1,
# "create_time":"2020-01-17T18:11:42.967727Z","end_spot":1}
|